This article explains a real-world business requirement and how Azure Service Bus Queue helps to fulfill the requirement.
Business Requirement
One of the utility bill payments company wants to build an application, which will do the mobile recharge for end users. The application should support all the operators which are available in the market. The flow is, the user sends SMS in predefined format and application should parse the message and do the recharge accordingly.
Now, the biggest challenge is the application gets a huge number of recharge requests during the peak hours and is not able to process each request, so the company is looking for something like where all the requests are parked when they come and process one by one.
Azure Service Bus
The company came to know about the Azure Service Bus provided by Azure, so he started exploring Azure Service Bus.
Azure Service Bus supports cloud-based message-oriented middleware technologies like Queue, Topic, and Relay.

Here in order to meet the business requirement, we will use the queue mechanism where all the requests will be added in the queue and another side queue listener will process the message by reading from the queue.
Queue
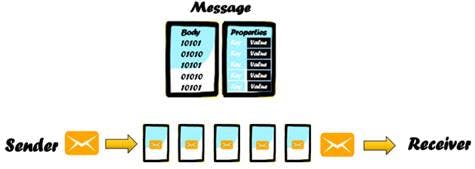
The sender sends the message, adds it into the queue and the receiver processes the message in a FIFO (First In First Out) manner. The benefit of using queue is, it creates decoupling between sender and receiver, means sender and receiver should not be available at the same time while sending the message as messages are stored in a queue. Another benefit is load leveling, which means sender sends messages at a different rate and the receiver can process messages at a different rate, as both are independent in sending and processing.
Now let's see the step by step implementation of the below to design a solution:
- Create Service Bus Namespace
- Create Queue
- Add a message in the queue
- Read Message from the queue
- Scheduled Message
- Receive Mode
- Abandoned Async
- Dead-letter Queue
Create Service Bus Namespace
Service bus namespace is a container for all messaging components. One namespace contains multiple queues and topics.
- Log in to the Azure portal via portal.azure.com
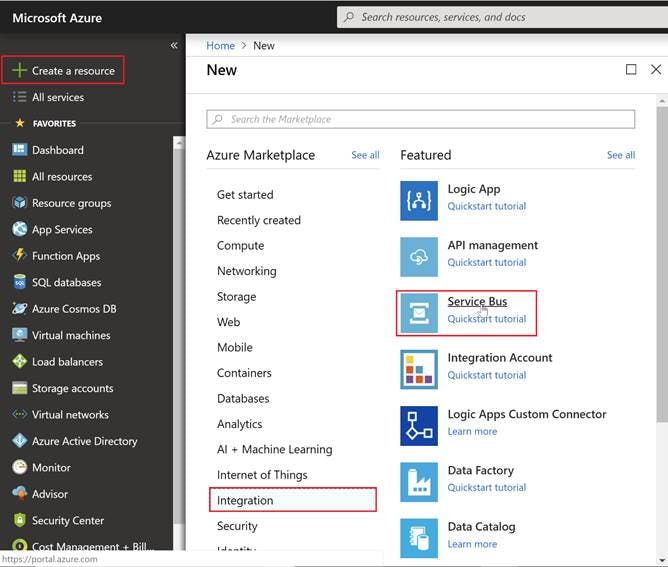
- Click on 'Create a resource' from the left navigation pane, click on 'Integration' and then 'Service Bus'.
- Enter the proper name for a namespace
- Select pricing tier, for demo purpose we have selected Basic
- Subscription and Resource group, keep it as it is
- Select your desired location and click on 'Create' button
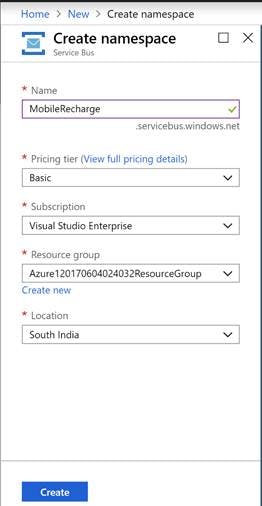
Once you create a namespace, you can explore the same from the dashboard where you can find all the details which you have provided while creating a namespace.

Credentials
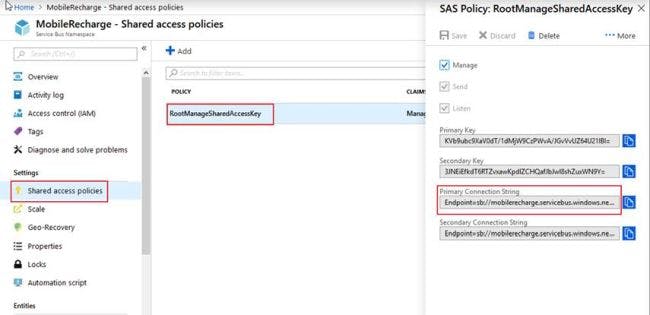
Click on 'Shared access policies' from the left panel, click on 'RootManageSharedAccessKey' to explore keys and connection strings which will be used further to connect.
Create Queue
- Click on 'Mobile Recharge' namespace on Dashboard
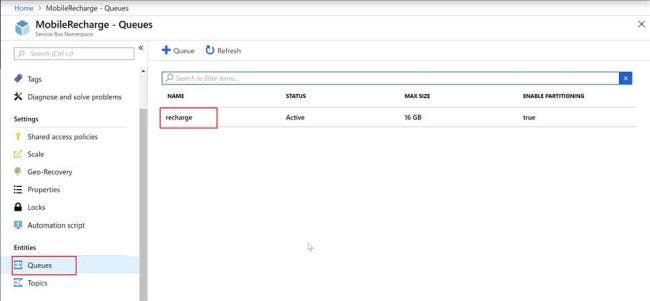
- Click on 'Queues' on the left pane and click on '+Queue' to create new Queue.

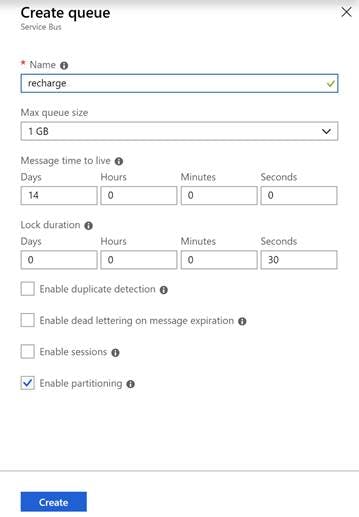
- Enter queue name and click on 'Create' button keeping the rest of the input as it is.
- Click on 'Queues' and you will get a list of created queues. You can also find our recently created queue; i.e. recharge.
Add Message in the QUEUE
- Create a console application in Visual Studio
- Set variables, one for connection string which you can copy from Shared access policies section and another is queue name; i.e. recharge
- In order to do the recharge, we need a mobile number, amount and operator from user
- Concatenate preceding three values separated with a star(*)
- Add Microsoft.Azure.ServiceBus from a NuGet package manager
- Create queue client using connection string and queue name
- Convert string message to Azure Service Bus message
- Using queue client, call SendAsync method to add a message in the queue.
- Call CloseAsync to close opened connection in finally block.
    class Program
        {
            static QueueClient queueClient;
            static void Main(string[] args)
            {
                string sbConnectionString = "Endpoint=sb://mobilerecharge.servicebus.windows.net/;SharedAccessKeyName=RootManageSharedAccessKey;SharedAccessKey=KVb9ubc9XaV0dT/1dMj/JGvVvUZ64U21IBI=";
                string sbQueueName = "Recharge";

                string messageBody=string.Empty;
                try
                {
                    Console.WriteLine("-------------------------------------------------------");
                    Console.WriteLine("Mobile Recharge");
                    Console.WriteLine("-------------------------------------------------------");
                    Console.WriteLine("Operators");
                    Console.WriteLine("1. Vodafone");
                    Console.WriteLine("2. Airtel");
                    Console.WriteLine("3. JIO");
                    Console.WriteLine("-------------------------------------------------------");

                    Console.WriteLine("Operator:");
                    string mobileOperator = Console.ReadLine();
                    Console.WriteLine("Amount:");
                    string amount = Console.ReadLine();
                    Console.WriteLine("Mobile:");
                    string mobile = Console.ReadLine();

                    Console.WriteLine("-------------------------------------------------------");

                    switch (mobileOperator)
                    {
                        case "1":
                            mobileOperator = "Vodafone";
                            break;
                        case "2":
                            mobileOperator = "Airtel";
                            break;
                        case "3":
                            mobileOperator = "JIO";
                            break;
                        default:
                            break;
                    }

                    messageBody = mobileOperator + "*" + mobile + "*" + amount;
                    queueClient = new QueueClient(sbConnectionString, sbQueueName);

                    var message = new Message(Encoding.UTF8.GetBytes(messageBody));
                    Console.WriteLine($"Message Added in Queue: {messageBody}");
                    queueClient.SendAsync(message);


                }
                catch (Exception ex)
                {
                    Console.WriteLine(ex.Message);
                }
                finally
                {
                    Console.ReadKey();
                    queueClient.CloseAsync();
                }
            }
        }
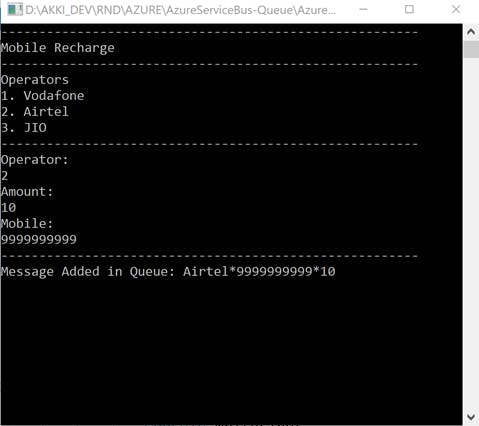
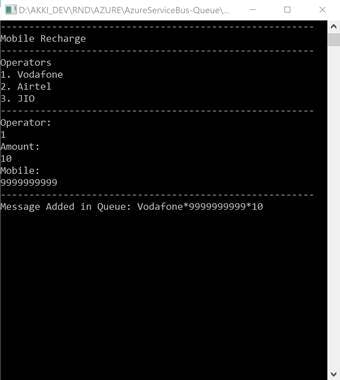
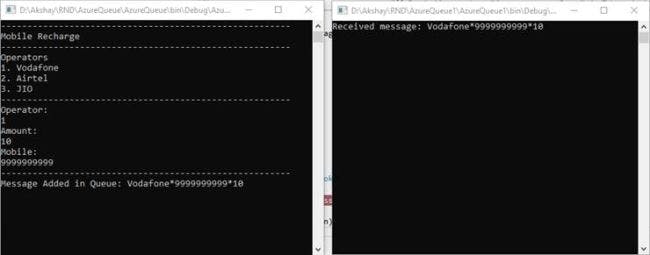
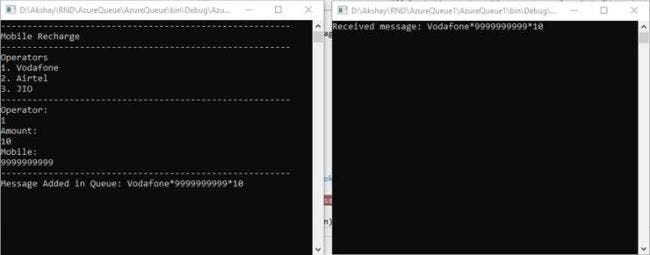
- Run the application and provide the required inputs
- You can see the message 'Message Added in Queue…'
- To check the added message in the portal, explore all the queues
- Click on the queue in which we have added the message i.e. 'Recharge'
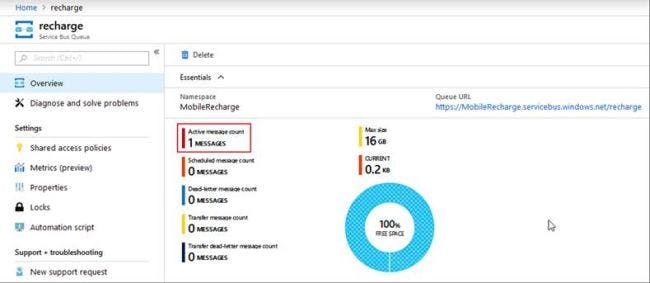
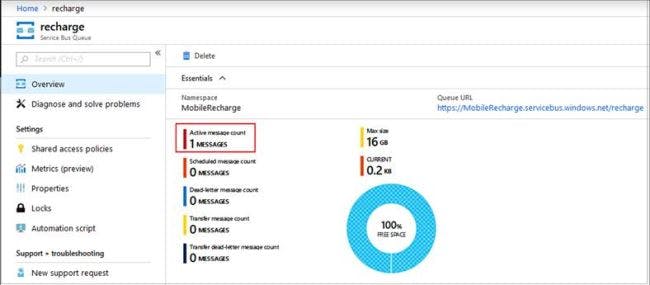
- We can see 'Active message count' as 1
Read Message from QUEUE
- Create a console application in the Visual Studio
- Set variables, one for connection string which you can copy from Shared access policies section and another is queue name; i.e. recharge
- Create queue client using connection string and queue name
- Using queue client, call RegisterMessageHandler which is used to receive messages continuously from the entity. Registers a message handler and begins a new thread to receive messages. This handler has waited every time a new message is received by the receiver.
- Inside ReceiveMessageAsync, call CompleteAsync which completes a message using its lock token and deletes the message from the queue.
class Program
    {
        static QueueClient queueClient;
        static void Main(string[] args)
        {
            string sbConnectionString = "Endpoint=sb://mobilerecharge.servicebus.windows.net/;SharedAccessKeyName=RootManageSharedAccessKey;SharedAccessKey=KVb9ubc9XaV0dT/1dMj/JGvVvUZ64U21IBI=";
            string sbQueueName = "Recharge";

            try
            {
                queueClient = new QueueClient(sbConnectionString, sbQueueName);

                var messageHandlerOptions = new MessageHandlerOptions(ExceptionReceivedHandler)
                {
                    MaxConcurrentCalls = 1,
                    AutoComplete = false
                };
                queueClient.RegisterMessageHandler(ReceiveMessagesAsync, messageHandlerOptions);
            }
            catch (Exception ex)
            {
                Console.WriteLine(ex.Message);
            }
            finally
            {
                Console.ReadKey();
                queueClient.CloseAsync();
            }
        }

        static async Task ReceiveMessagesAsync(Message message, CancellationToken token)
        {
            Console.WriteLine($"Received message: {Encoding.UTF8.GetString(message.Body)}");

            await queueClient.CompleteAsync(message.SystemProperties.LockToken);
        }

        static Task ExceptionReceivedHandler(ExceptionReceivedEventArgs exceptionReceivedEventArgs)
        {
            Console.WriteLine(exceptionReceivedEventArgs.Exception);
            return Task.CompletedTask;
        }
    }
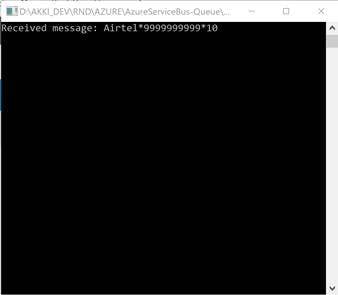
- Run the application and you can see the previously added message in the queue.
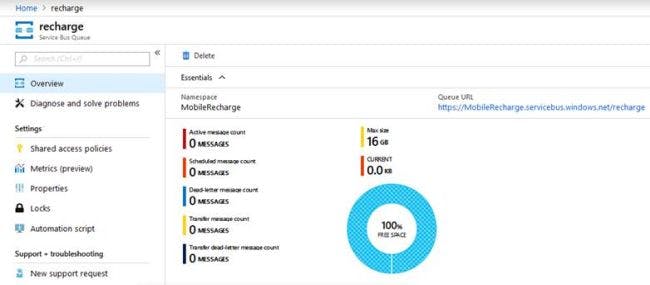
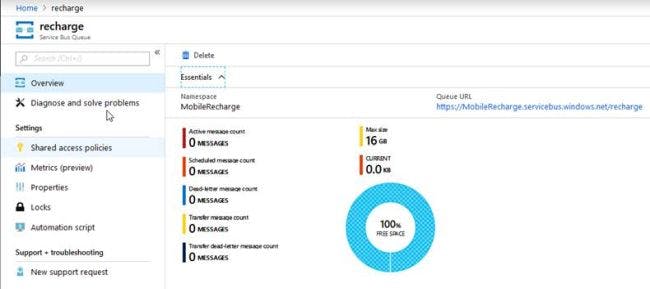
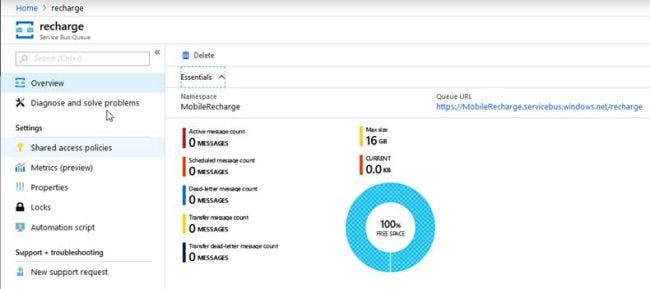
- Check the queue once again in the portal and you can see the 'Active message count' as zero(0) as it was deleted by CompleteAsync.
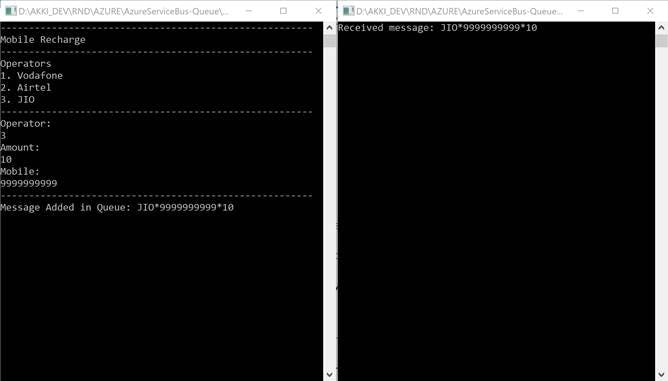
- Now run both the applications simultaneously and provide the required inputs
- You can observe that the message will be read by the second application immediately.
Scheduled Message Now let's tweak the requirement, where we want to do recharge after a specific time, not now. So for this, we have scheduled message facility where you can schedule a message for a specific time. In the demo, we will set it after 5 minutes.
In order to implement this, we need to comment SendSync method and call ScheduleMessageAsync which expects a message and schedule time.
Modify your code as below,
DateTimeOffset scheduleTime = DateTime.UtcNow.AddMinutes(5);
queueClient.ScheduleMessageAsync(message,scheduleTime);
- Run your application once again
- Provide required inputs
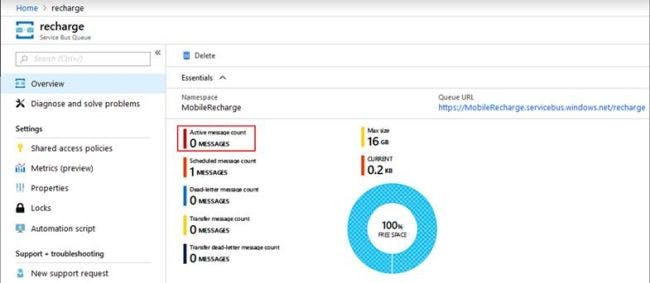
We can observe in the portal that the message is not added in the queue as 'Active message count' is zero (0) only.
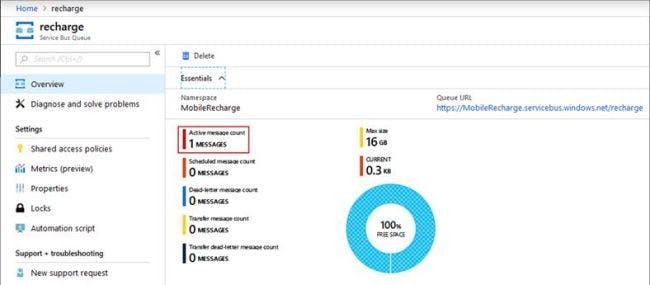
Now wait for 5 minutes and verify once again in a portal. We can see that it's added as 5 minutes have passed.
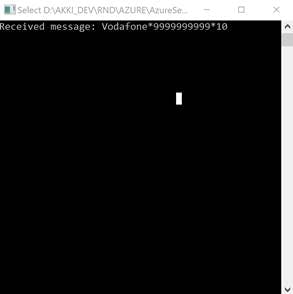
Run the read application and you can get the scheduled message.
Receive Mode In the next step after receiving the message, you need to process that message; i.e. need to do a recharge. Now assume that while processing the message some exception occurs, then we may lose the request completely. For this situation, we have a Receive Mode facility.
You can specify two different modes as Receive Mode:
- PeekLock
- Receive and Delete
PeekLock
In this mode, the message won't be deleted until you call CompleteAsync method, so while processing if any exception occurs, we don't lose the message.
- Run both the applications simultaneously in debug mode.
- Provide the required input, and read application shows the added message.
Let's check the message in the portal, ideally, it was read by read application, so it should not be there in the portal but as Receive Mode is Peeklock, the message will be there.
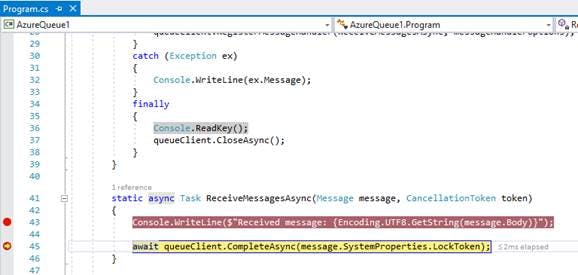
Execute CompleAsync method after processing the message.
We can see in the portal that the message is not available as we have already called CompleteAsync.
ReceiveAndDelete
In Receive and Delete mode, as soon as the message is read, it will be deleted from the queue.
- Run both applications simultaneously in debug mode.
- Provide the required input and read application shows the added message.
- Don't execute CompleAsync method, just hold the debug point there only.
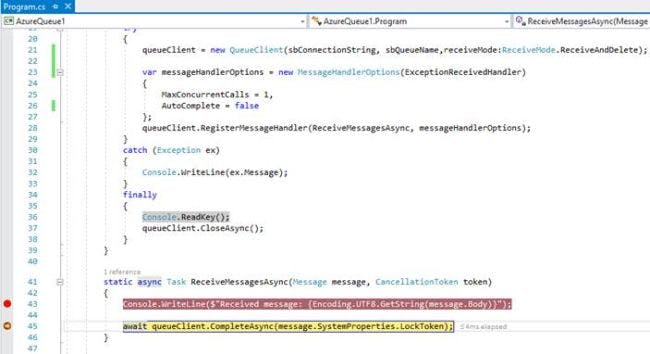
- Now, verify the message in the portal, ideally, CompleAsync is not called, so the message should be there but as we set ReceiveAndDelete mode, the message is deleted as soon as it was read.
AbandonAsync
Now in your application, whenever an exception occurs during processing you want to reprocess the message again. For this, we have the facility of AbandonAsync.
AbandonAsync abandons a Message using a lock token, this will make the message available again for processing.
To verify this we need to throw an exception explicitly from ReceiveMessageAsync and from the catch block call AbandonAsync method.
    static async Task ReceiveMessagesAsync(Message message, CancellationToken token)
            {
                try
                {
                    Console.WriteLine($"Received message: {Encoding.UTF8.GetString(message.Body)}");

                    int i = 0;
                    i=i / Convert.ToInt32(message);

                    await queueClient.CompleteAsync(message.SystemProperties.LockToken);
                }
                catch(Exception ex)
                {
                   await queueClient.AbandonAsync(message.SystemProperties.LockToken);
                }
            }
Run the application once again and from the read application we can observe that the same message was read 10 times, this means whenever an exception occurs it was available once again to process.
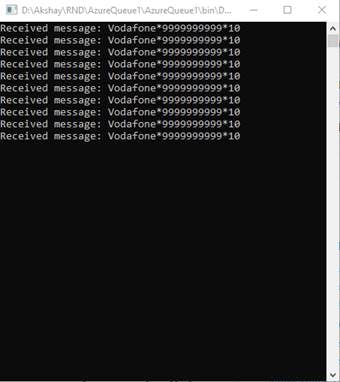
You can configure the reprocess count from properties by setting Maximum Delivery Count. Previously it was read 10 times because, by default, Maximum Delivery Count is set to 10.
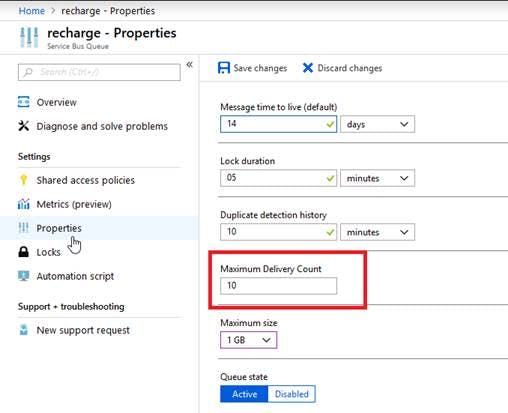
Once the 10-time process is over, it is no longer available in the queue, and it will be added in the Dead-letter queue. We can verify the same thing in the portal.
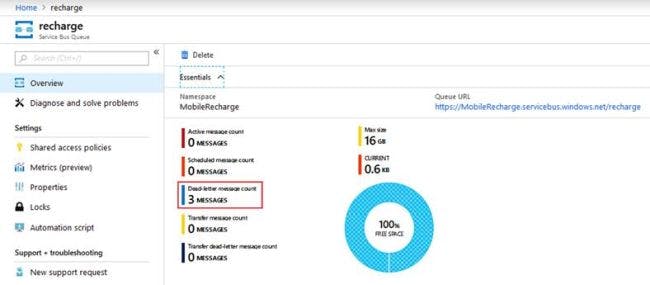
Dead-letter Queue
Now, in order to read the messages from the Dead-letter queue for analyzing purposes, the same application is used, you just need to change the queue name as below:
string sbQueueName = "Recharge/$DeadLetterQueue";
Run the application and it will read all messages available in Dead-letter queue.
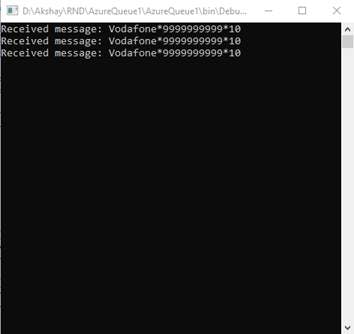
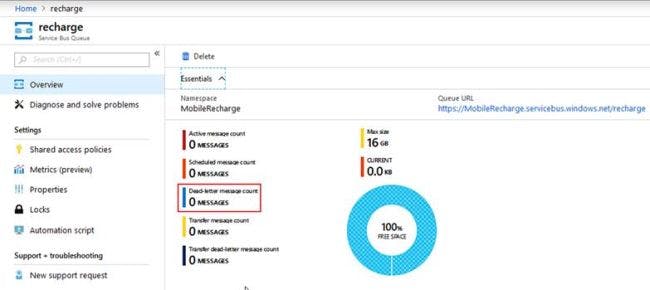
We don't find any messages in Dead-letter queue now.
In the next article, we will discuss Azure Service Bus - Topic.
Note: You can download the complete sample code from here .

